General Information
Workshop — Jan 3, 2026: 10AM to 12PM Presentation from — Sonny Green @ www.sonny.photos. Meeting place — Clerks Coffee Company (Emeline Hotel) 181 Church St, Charleston, SC 29 401, USA (Meet at the four chairs in the middle of the coffee shop). If you are late text, 843-843-6542 to find us.
Price: $50 per-person
READ FIRST: How to Use The Guide
This is a group workshop, not a private lesson. That means we will move together, learn together, and grow together as a class. If we’re all on the same page and similar in skill level, this guide will help us move smoothly (but it is not mandatory to follow this guide). If someone needs more help than others, we will support—but please make sure you know how to operate your own camera before joining this group setting. This guide is designed to walk us through ideas, exercises, and shooting techniques step-by-step. Nothing here is fixed—it’s a shared plan we’ll follow if we all agree. The more open, curious, and respectful we are as a group, the more we’ll get out of the workshop. Every section includes not just the concept, but an explanation of what it means, how it works, and why we’re doing it. Last, the amount of information in this syllabus is way more than what we can cover in two hours. This outline is meant for you to take home to continue your growth. Thank you for joining the
OVERVIEW:
This workshop introduces beginner photographers to the foundational techniques, concepts, and creative practices needed to build confidence with their camera. Through guided learning, hands-on exercises, and group feedback, students will explore how light, exposure, and composition work together to create expressive, technically sound images. This is a supportive learning environment where curiosity is encouraged and every question is welcome.
We’ll work through three progressive sections: (1) Understand how to see light and compose images thoughtfully, (2) Understanding the technical controls of your camera, and (3) Exploring personal storytelling through photography. Each hour includes teaching, examples, hands-on photo walks, and peer reflection. Throughout, we will also explore the pros and cons of different approaches and techniques, to give you a more complete perspective as a photographer.
KEY TERMINOLOGY (with Explanations for Beginners):
-
Exposure: The amount of light captured
in a photograph—controlled by aperture, shutter speed, and ISO. More
light = brighter image; less light = darker image. Think of it as your
image’s brightness dial.
Pro: Full control of mood and visibility.
Con: Easy to accidentally over- or underexpose when learning. -
Aperture: The size of the hole in the lens that lets
in light. A wide aperture (like f/2.8) blurs the background. A small
aperture (like f/11) keeps more of the scene sharp.
Pro: Great creative control over focus and depth.
Con: Wide apertures can cause focus errors in low light or movement. -
Shutter Speed: How long your shutter stays open. A fast speed (like 1/1000) freezes action. A slow speed (like 1/30) shows motion blur.
Pro: Can create dynamic or frozen images.
Con: Slow speeds without a tripod can lead to unintentional blur. -
ISO: The camera’s sensitivity to light. Low ISO
(100–200) is clean and best for daylight. High ISO (800–3200) works
in low light but may look grainy.
Pro: Can shoot in dark situations without flash.
Con: High ISO adds digital noise and reduces image quality. -
Depth of Field: How much of the image is in focus. Shallow = blurry background; deep = everything is sharp.
Pro: Strong subject isolation and creative blur.
Con: Shallow depth can lead to missed focus, especially with moving subjects. -
Composition: How you arrange things in the frame—what’s included, what’s left out, and where you put your subject.
Pro: Guides viewer attention and emotional response.
Con: Rules like the rule of thirds may become restrictive if not used flexibly. -
Natural Light: Any light not made by a flash or bulb—like sunshine, shade, or reflections.
Pro: Beautiful, free, and natural-looking.
Con: Conditions can change quickly and be hard to control. -
Manual Mode: You’re the boss of aperture, shutter, and ISO—not the camera’s auto setting.
Pro: Total creative control for consistent results.
Con: Can be overwhelming for beginners and slow down shooting.
WORKSHOP SCHEDULE
Each hour will expand the following content, filled-in examples, and pros and cons of each concept, method, or technique to support deeper learning and help students recognize the trade-offs of each approach.
HOUR 1: UNDERSTANDING LIGHT & COMPOSITION
This first hour is about learning to see like a photographer. Light isn’t just a technical element—it is the emotional and visual foundation of every image. Likewise, composition is the art of directing the viewer’s eye and expressing meaning through arrangement. In this hour, you’ll observe how different types and directions of light change your subject and how basic compositional structures add power and clarity to your photographs.
How Light Shapes an Image
-
Golden Hour: Soft, warm light makes skin glow and shadows long.
Pro: Beautiful and flattering; great for beginners.
Con: Limited window of time each day. -
Midday Sun: Harsh, directional light with strong shadows.
Pro: Can be dramatic and contrasty.
Con: Can be unflattering for portraits; high contrast can blow out highlights. -
Cloudy Days: Like a natural softbox.
Pro: Gentle, even tones ideal for portraits or product photography.
Con: Less dramatic; colors can appear muted. -
Window Light: Ideal indoor light source.
Pro: Easy to find and control.
Con: Limited range and requires positioning.
Direction of Light
- Front Light: Flat but safe. Shows all details equally.
- Side Light: Adds depth and texture. Use for mood or drama.
- Backlight: Dreamy, ethereal, great for silhouettes or rim lighting.
- Overhead Light: Natural at noon or from lamps—can create “raccoon eyes.”
Composition Techniques
- Rule of Thirds: Visually pleasing but sometimes overused.
- Leading Lines: Strong direction and structure, but avoid clutter.
- Symmetry: Great for balance, but can feel static.
- Framing: Adds depth and mystery—watch for distractions.
- Negative Space: Emphasizes subject and emotion—may feel “empty” if not intentional.
Examples
- A child silhouetted by a glowing sunset.
- A brick wall showing dramatic texture from side light.
- A coffee cup on a window sill using negative space.
- A portrait under soft clouds using the rule of thirds.
Tips
- Move around your subject to explore how the light shifts.
- Use your phone or camera grid to help compose.
Exercises
- Photograph one subject in front light, side light, and backlight.
- Choose one subject and shoot it with rule of thirds, symmetry, and framing.
- Find a reflective surface and shoot a portrait using indirect window light.
- Explore golden hour in your neighborhood.
- Create one image using only negative space and one main subject.
HOUR 2: MASTERING CAMERA SETTINGS & THE EXPOSURE TRIANGLE
This hour is about demystifying your camera and giving you the confidence to shoot in manual mode—or semi-manual modes like Aperture Priority. You’ll learn how aperture, shutter speed, and ISO work together and what trade-offs are involved when adjusting each one. The goal is not just technical understanding, but creative application.
The Exposure Triangle
A Practical Way to Understand Light, Time, and Sensitivity
Think of aperture, shutter speed, and ISO as a balancing act.
When you change one, the others must respond. There is no “correct” exposure—only a deliberate one.
Photography is not about perfection; it’s about choosing what matters most in the moment.
“A photograph is usually looked at—seldom looked into.”
— Ansel Adams
The exposure triangle is how you begin looking into your photographs.
Aperture (f/stop)
Aperture controls how much of the scene is in focus.
-
f/2.8
Wide opening → more light → shallow depth of field
Background blurs, subject separates -
f/11
Small opening → less light → deeper focus
More of the scene stays sharp
What aperture feels like
Aperture is about attention.
It decides what the viewer should notice and what can fade away.
“Sharpness is a bourgeois concept.”
— Henri Cartier-Bresson
Pros
- Strong creative control over mood and focus
- Allows subject isolation
- Excellent for portraits, details, storytelling
Cons
- Very wide apertures can miss focus
- Very small apertures require more light or slower shutter speeds
- Too much blur can weaken context if overused
Practical Tips
- Start portraits at f/2.8–f/4
- Street photography often lives well around f/5.6
- Landscapes usually benefit from f/8–f/11
Exercise: Focus as a Choice
- Photograph the same subject at f/2.8, f/5.6, and f/11
- Compare how the story changes, not just sharpness
- Ask: What does the blur remove? What does it protect?
Shutter Speed
Shutter speed controls how motion and time appear.
-
1/1000 sec
Freezes motion
Useful for action, sports, movement -
1/30 sec
Allows motion blur
Useful for low light, movement, atmosphere
What shutter speed feels like
Shutter speed decides how time behaves in your image.
“What matters is not what you photograph, but why you photograph it.”
— Garry Winogrand
Pros
- Controls energy and stillness
- Can freeze moments or stretch them
- Adds emotion through blur or clarity
Cons
- Too slow without support = unwanted blur
- Too fast in low light = underexposure
- Requires steady hands or a tripod at slower speeds
Practical Tips
- Handheld safety rule:
Use a shutter speed faster than your focal length
(e.g., 1/50 for a 50mm lens) - Motion blur often starts around 1/30–1/15
- Freeze people walking at 1/250
Exercise: Time Study
- Photograph a moving subject at:
- 1/1000
- 1/125
- 1/30
- Review which image feels most honest
- Decide whether stillness or motion tells the better story
ISO
ISO controls the camera’s sensitivity to light.
-
ISO 100
Clean, crisp image
Best for daylight and bright conditions -
ISO 1600+
More sensitive in low light
Introduces grain / noise
What ISO feels like
ISO is about necessity, not style (most of the time).
“Grain is not noise. It is texture.”
— Saul Leiter
Pros
- Allows you to photograph in low light
- Preserves shutter speed and aperture choices
- Expands when and where you can shoot
Cons
- Higher ISO introduces digital noise
- Too much noise can reduce detail
- Can flatten colors if pushed too far
Practical Tips
- Use the lowest ISO possible
- Don’t fear ISO—fear missing the photograph
- Modern cameras handle ISO far better than older ones
Exercise: Acceptable Grain
- Photograph the same scene at ISO:
- 100
- 800
- 3200
- View them on a screen and imagine them printed
- Decide: Where does grain become character instead of a problem?
Putting It All Together
Exposure is not a formula — it’s a decision.
When you adjust:
- Aperture → you change focus and mood
- Shutter Speed → you change time and energy
- ISO → you change sensitivity and texture
undefined
“There are no rules for good photographs, there are only good photographs.”
— Ansel Adams
Final Exercise: One Variable at a Time
- Choose a simple subject
- Lock ISO
- Shoot three images:
- Change only aperture
- Change only shutter speed
- Change only ISO
- Review which change affected the feeling most
Manual vs. Auto Modes
-
Auto Mode
- Pro: Quick and convenient
- Con: Camera makes decisions—you may not like the results
-
Manual Mode
- Pro: Full creative control and consistent results
- Con: Slower at first; takes practice to master
-
Aperture Priority (A/Av)
- You choose aperture, camera adjusts shutter
- Pro: Great compromise between control and speed
- Con: Can misjudge light in tricky conditions
Focus Modes
- AF-S (Single): Use for still subjects
- AF-C (Continuous): Use for moving subjects
- Manual Focus: Use for fine-tuning or tricky light
- Back-Button Focus: Separates focusing from shutter release
Lens Choices
-
Prime (35mm, 50mm): Sharp, bright, fixed zoom
- Pro: Teaches framing; better in low light
- Con: You have to move your feet more
-
Zoom (18–55mm): Flexible but slower
- Pro: Versatility for beginners
- Con: Often darker (higher f/stop), especially indoors
- Wide (16–35mm): Expansive, great for interiors or landscapes
- Telephoto (85mm–200mm): Isolates subjects, compresses background
Tips
- Use your histogram—it shows more than the LCD screen.
- Start in aperture priority and explore depth of field.
- Try burst mode for moving subjects.
Final Exercises
- Exposure Test: Photograph the same scene with three different exposure settings. Compare how each affects brightness and feel.
- Aperture Series: Shoot the same subject at f/2.8, f/5.6, and f/11. Observe how focus changes.
- Shutter Speed Challenge: Shoot a friend walking at 1/30, 1/250, and 1/1000.
- ISO Comparison: Take the same photo at ISO 100, 800, and 3200. Zoom in to inspect grain.
- Focus Mode Demo: Use AF-C vs AF-S on a moving subject. Which nails focus better?
Closing Thought
Mastering the exposure triangle isn’t about control —
it’s about intentional seeing.
Once you understand how the camera responds to light,
you’re free to focus on why you’re making the photograph at all.
HOUR 3: STORYTELLING & CREATIVE PRACTICE
From Technique to Personal Voice
The final hour is about bringing everything together—your understanding of light, your control of the camera, and your developing eye for composition—and using those tools to begin shaping a photographic voice.
This is where photography moves beyond settings and into meaning.
You are no longer just asking “Is this exposed correctly?”
You are beginning to ask “Why does this matter to me?”
“Photography is not about the thing photographed. It is about how that thing feels photographed.”
— Garry Winogrand
This hour focuses on visual storytelling, creative awareness, and building a practice that continues long after the workshop ends.
What Makes a Good Story in a Photograph?
A story in photography is not always a beginning, middle, and end.
Often, it is a fragment—a gesture, a glance, a pause, or an atmosphere.
A strong photograph may answer one question and leave several others open.
Ask yourself:
- What is happening here?
- What does this moment feel like?
- What is just outside the frame?
Story can live in:
- A person’s posture
- The relationship between light and shadow
- An object left behind
- A fleeting interaction
- A sense of waiting or movement
undefined
“The world is full of stories, but most people walk past them.”
— Mary Ellen Mark
Thinking in Sequences
Storytelling becomes stronger when you think in before, during, and after.
Instead of chasing a single “perfect” image, ask:
- What led up to this moment?
- What is happening right now?
- What might happen next?
Pros:
- Adds emotional depth and meaning beyond technique
- Helps viewers connect personally to your images
Cons:
- Harder to capture in one frame
- Requires patience, observation, and missed shots
- Often invisible until reviewed later
Seeing With Intention
Learning to Notice Before You Photograph
Intentional seeing means slowing down—mentally and physically.
Instead of hunting for dramatic subjects, begin to notice:
- Quiet gestures
- Small shifts in light
- Repetition and pattern
- Stillness
- Negative space
undefined
“You don’t take a photograph, you make it.”
— Ansel Adams
This kind of seeing is built through attention, not effort.
Practical Practices
- Pause before raising the camera
- Watch how people move through a space
- Wait for the light to change
- Return to the same spot more than once
Pros:
- Develops intuition
- Sharpens observation
- Leads to more personal work
Cons:
- Fewer total images
- Requires comfort with waiting and uncertainty
Techniques for Visual Storytelling
The Three-Shot Story
A Simple Structure to Guide Your Eye
- Wide Shot — establishes place and context
- Medium Shot — introduces subject or action
- Close-Up — reveals detail, emotion, or texture
undefined
“The best pictures are the ones you didn’t know you were looking for.”
— Dorothea Lange
Pro:
- Gives structure to photo walks
- Encourages variety in perspective
Con:
- Can become formulaic if used mechanically
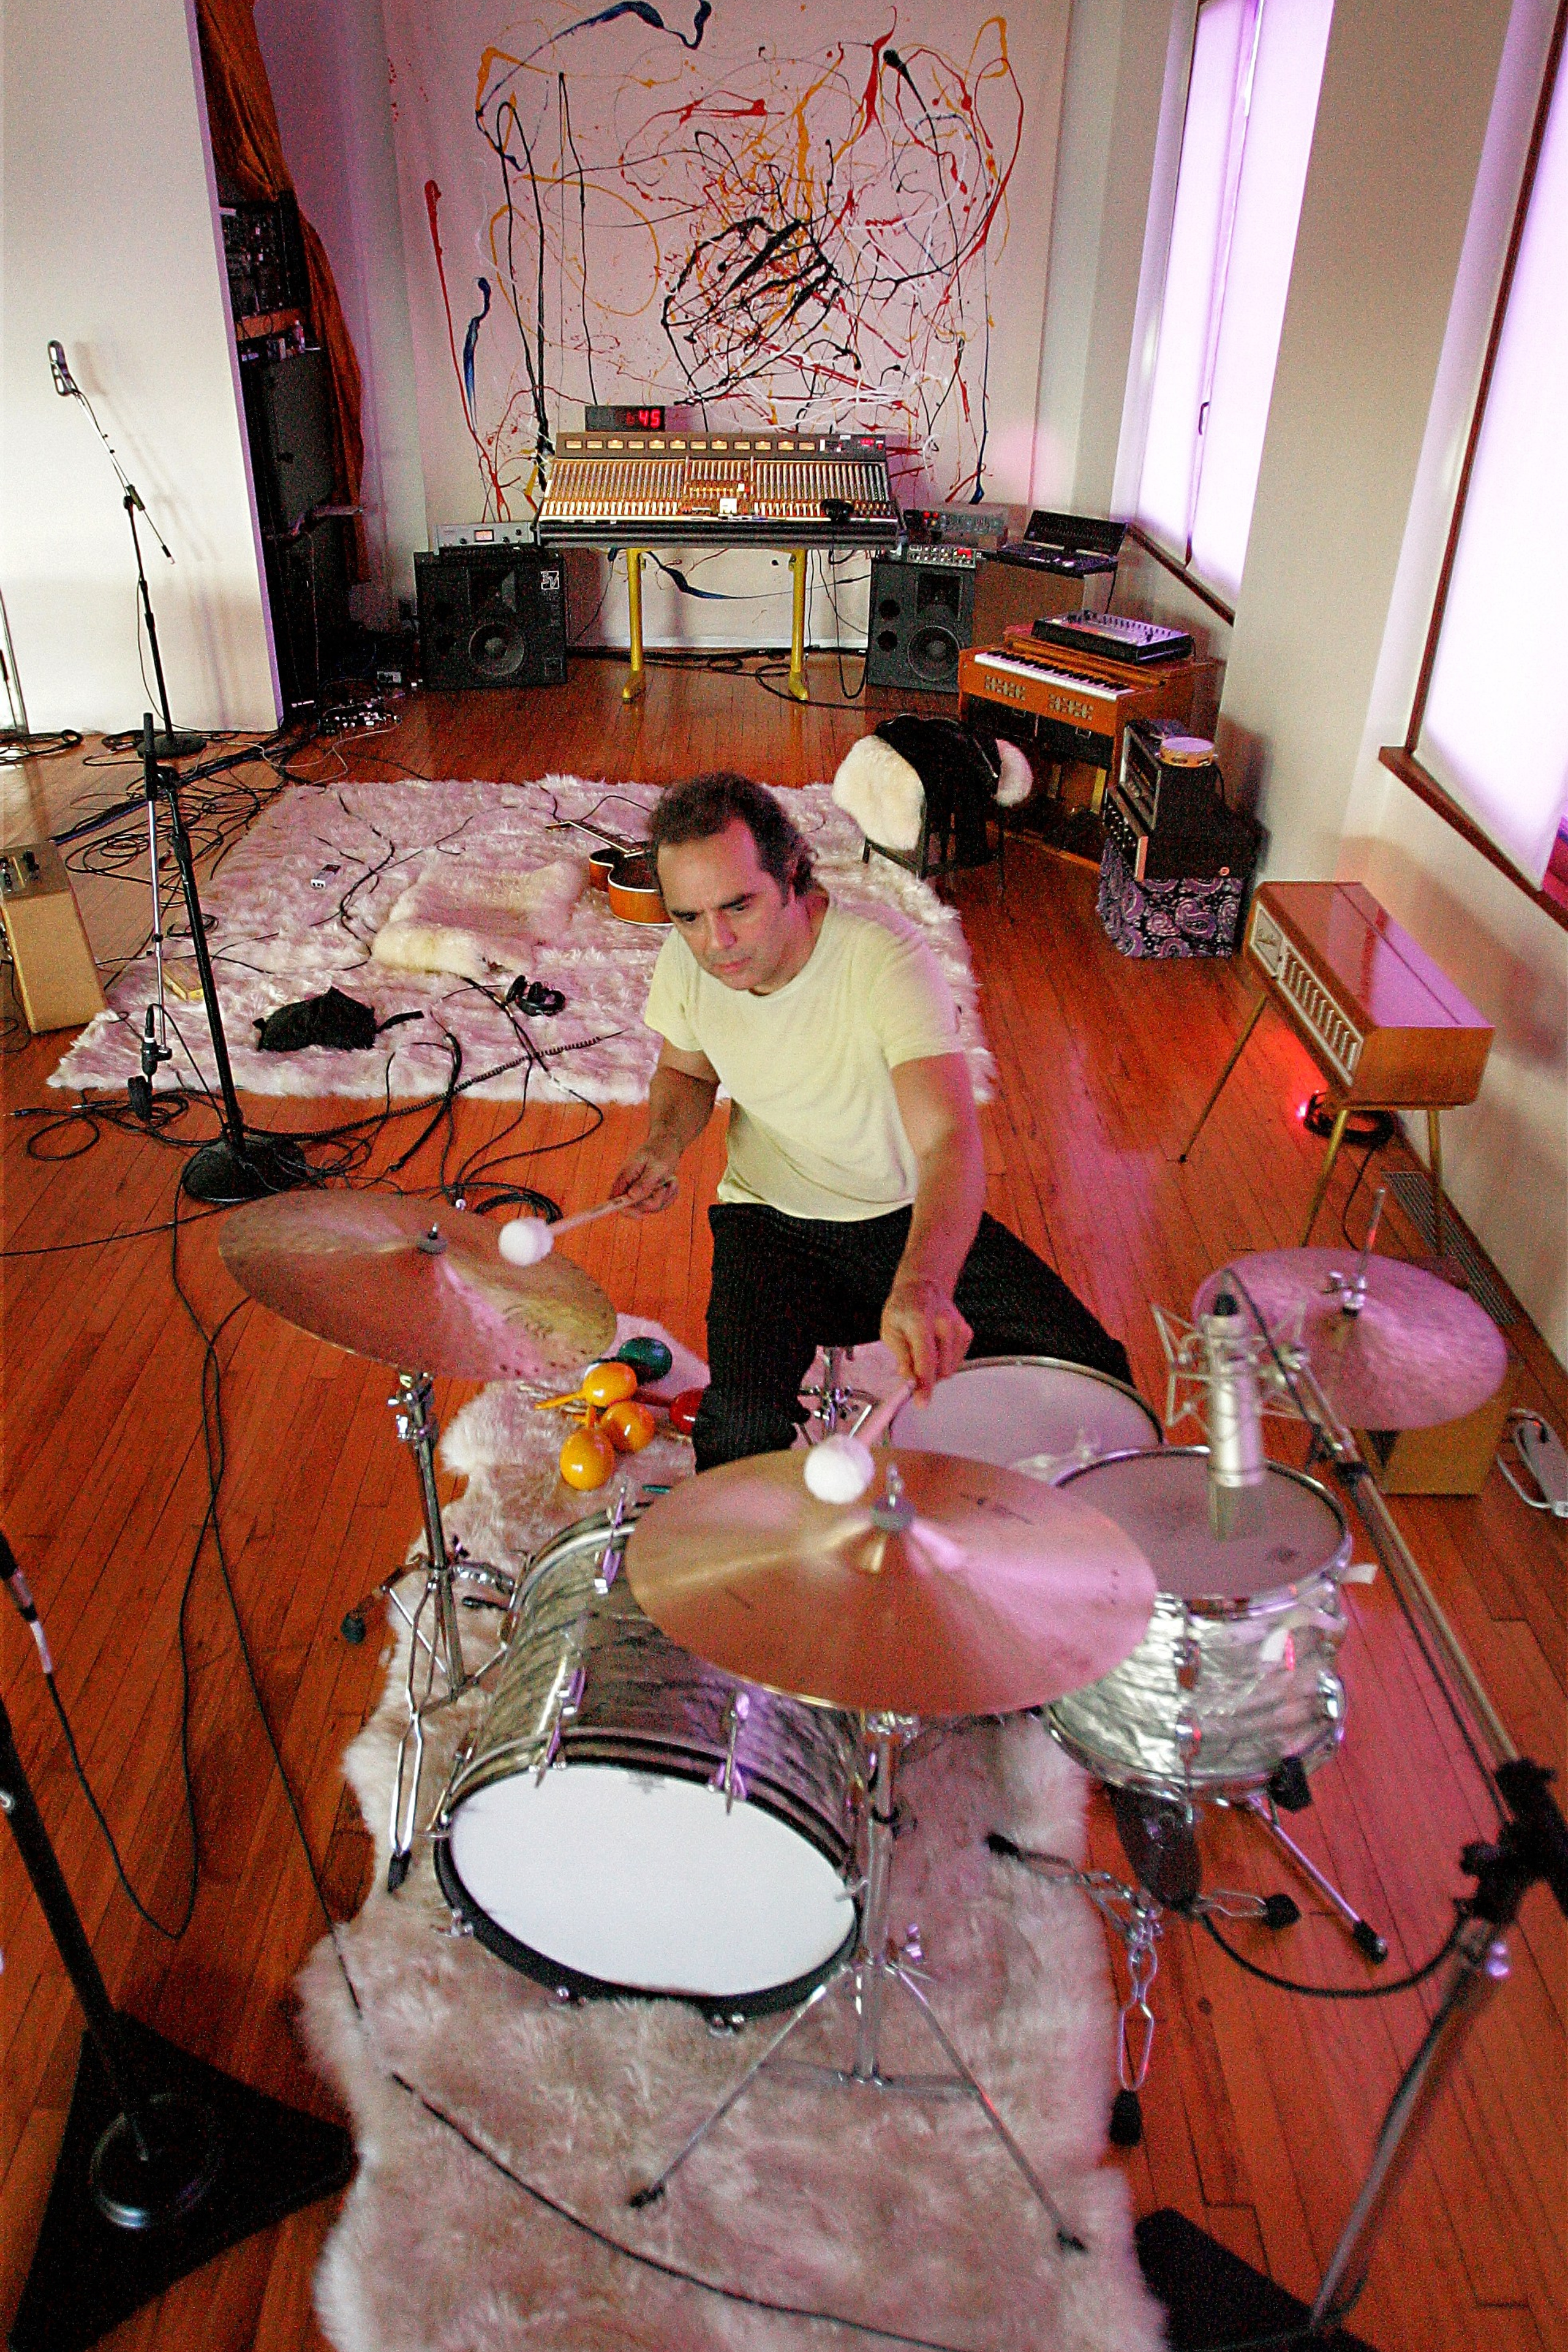
Environmental Portraits
People in Their World
An environmental portrait tells us who someone is by showing where they are.
Look for:
- Objects they interact with
- Tools, clothing, or personal items
- The relationship between person and space
Pro:
- Adds depth and context
- Feels honest and grounded
Con:
- Requires trust, permission, and awareness
- Demands sensitivity and respect
Contrast & Mood
Using Light and Composition Emotionally
Mood can be shaped through:
- High contrast vs. soft light
- Color vs. black-and-white
- Crowded frames vs. empty space
- Sharpness vs. blur
undefined
“Color is descriptive. Black and white is interpretive.”
— Elliott Erwitt
Pro:
- Emotionally powerful
- Helps define your visual voice
Con:
- Subjective
- Easy to overdo without intention
Creative Habits That Build Confidence
How Photographers Actually Improve
Photography grows through routine, not inspiration.
Sustainable Habits
- Weekly themes (e.g., waiting, red, hands, shadows)
- Photo journal: one image a day with a short reflection
- Revisiting locations to notice change
- Sharing work for feedback, not validation
undefined
“You learn photography by making photographs.”
— Joel Meyerowitz
Progress comes from showing up, not judging yourself.
Examples of Visual Stories
- A market vendor’s hands arranging fruit (detail), surrounded by chaos (wide)
- A friend waiting at a bus stop—posture, glance, shadow
- An abandoned chair with peeling paint and dappled light
- A doorway half-lit at dusk
- A reflection in a shop window layered with street life
Practical Tips for Story-Driven Photography
- Look for tension, humor, or contradiction
- Ask: What am I actually drawn to?
- Use black-and-white to simplify and focus on emotion
- Trust instinct over perfection
- Break the rules if it feels honest
- Undefined
“If you’re not emotionally involved, your pictures won’t be either.”
— Robert Capa
Exercises (Expanded)
1. Story in Three Shots
Tell a complete mini-story using:
- One wide
- One medium
- One close-up
2. Theme Walk
Choose one theme (reflection, shadow, red, isolation, repetition)
Capture 5–10 images that explore it from different angles.
3. Environmental Portrait
Photograph someone in their natural space.
Include at least three contextual details that help describe them.
4. Daily Detail
Find a small, quiet detail that hints at a larger story:
- A torn poster
- A crack in the sidewalk
- Light on a wall
- An object left behind
5. Before & After
Photograph the same scene at the start and end of the session.
What changed?
- Light?
- Mood?
- Your awareness?
Closing Thought
Photography is not about having something to say loudly.
It is about learning to listen visually.
Technique gives you tools.
Story gives you direction.
Practice gives you a voice.
BEGINNING PHOTOGRAPHY WORKSHOP WRAP-UP
Wrap-Up: What You’ve Learned
- Exposure is a creative balance between aperture, shutter speed, and ISO.
- Manual mode helps you tell stories your way.
- Composition brings order and emotion to your images.
- Light is your most powerful creative tool.
- Photography isn’t just about cameras—it’s about how you see.
Ask Yourself:
- What surprised you today?
- What frustrated you—and what excited you?
- What do you want to try again tomorrow?
Next Steps:
- Pick a daily light condition—sunrise, shade, dusk—and photograph it all week.
- Choose one setting (aperture, ISO, etc.) to practice each day.
- Start a photo journal: pick one photo each day and write 3 sentences about it.
- Share your work with others. Feedback is fuel for growth.
Keep your camera close and your curiosity closer. You’re on your way!
Presented by: Sonny Green at Sonny.Photos
For more tips and upcoming workshops, visit:
https://sonnyphotos.wfolio.pro/
https://www.backporchtours.com/
Events

A HISTORIC VIEW OF PHOTOGRAPHY 2hr Lecture

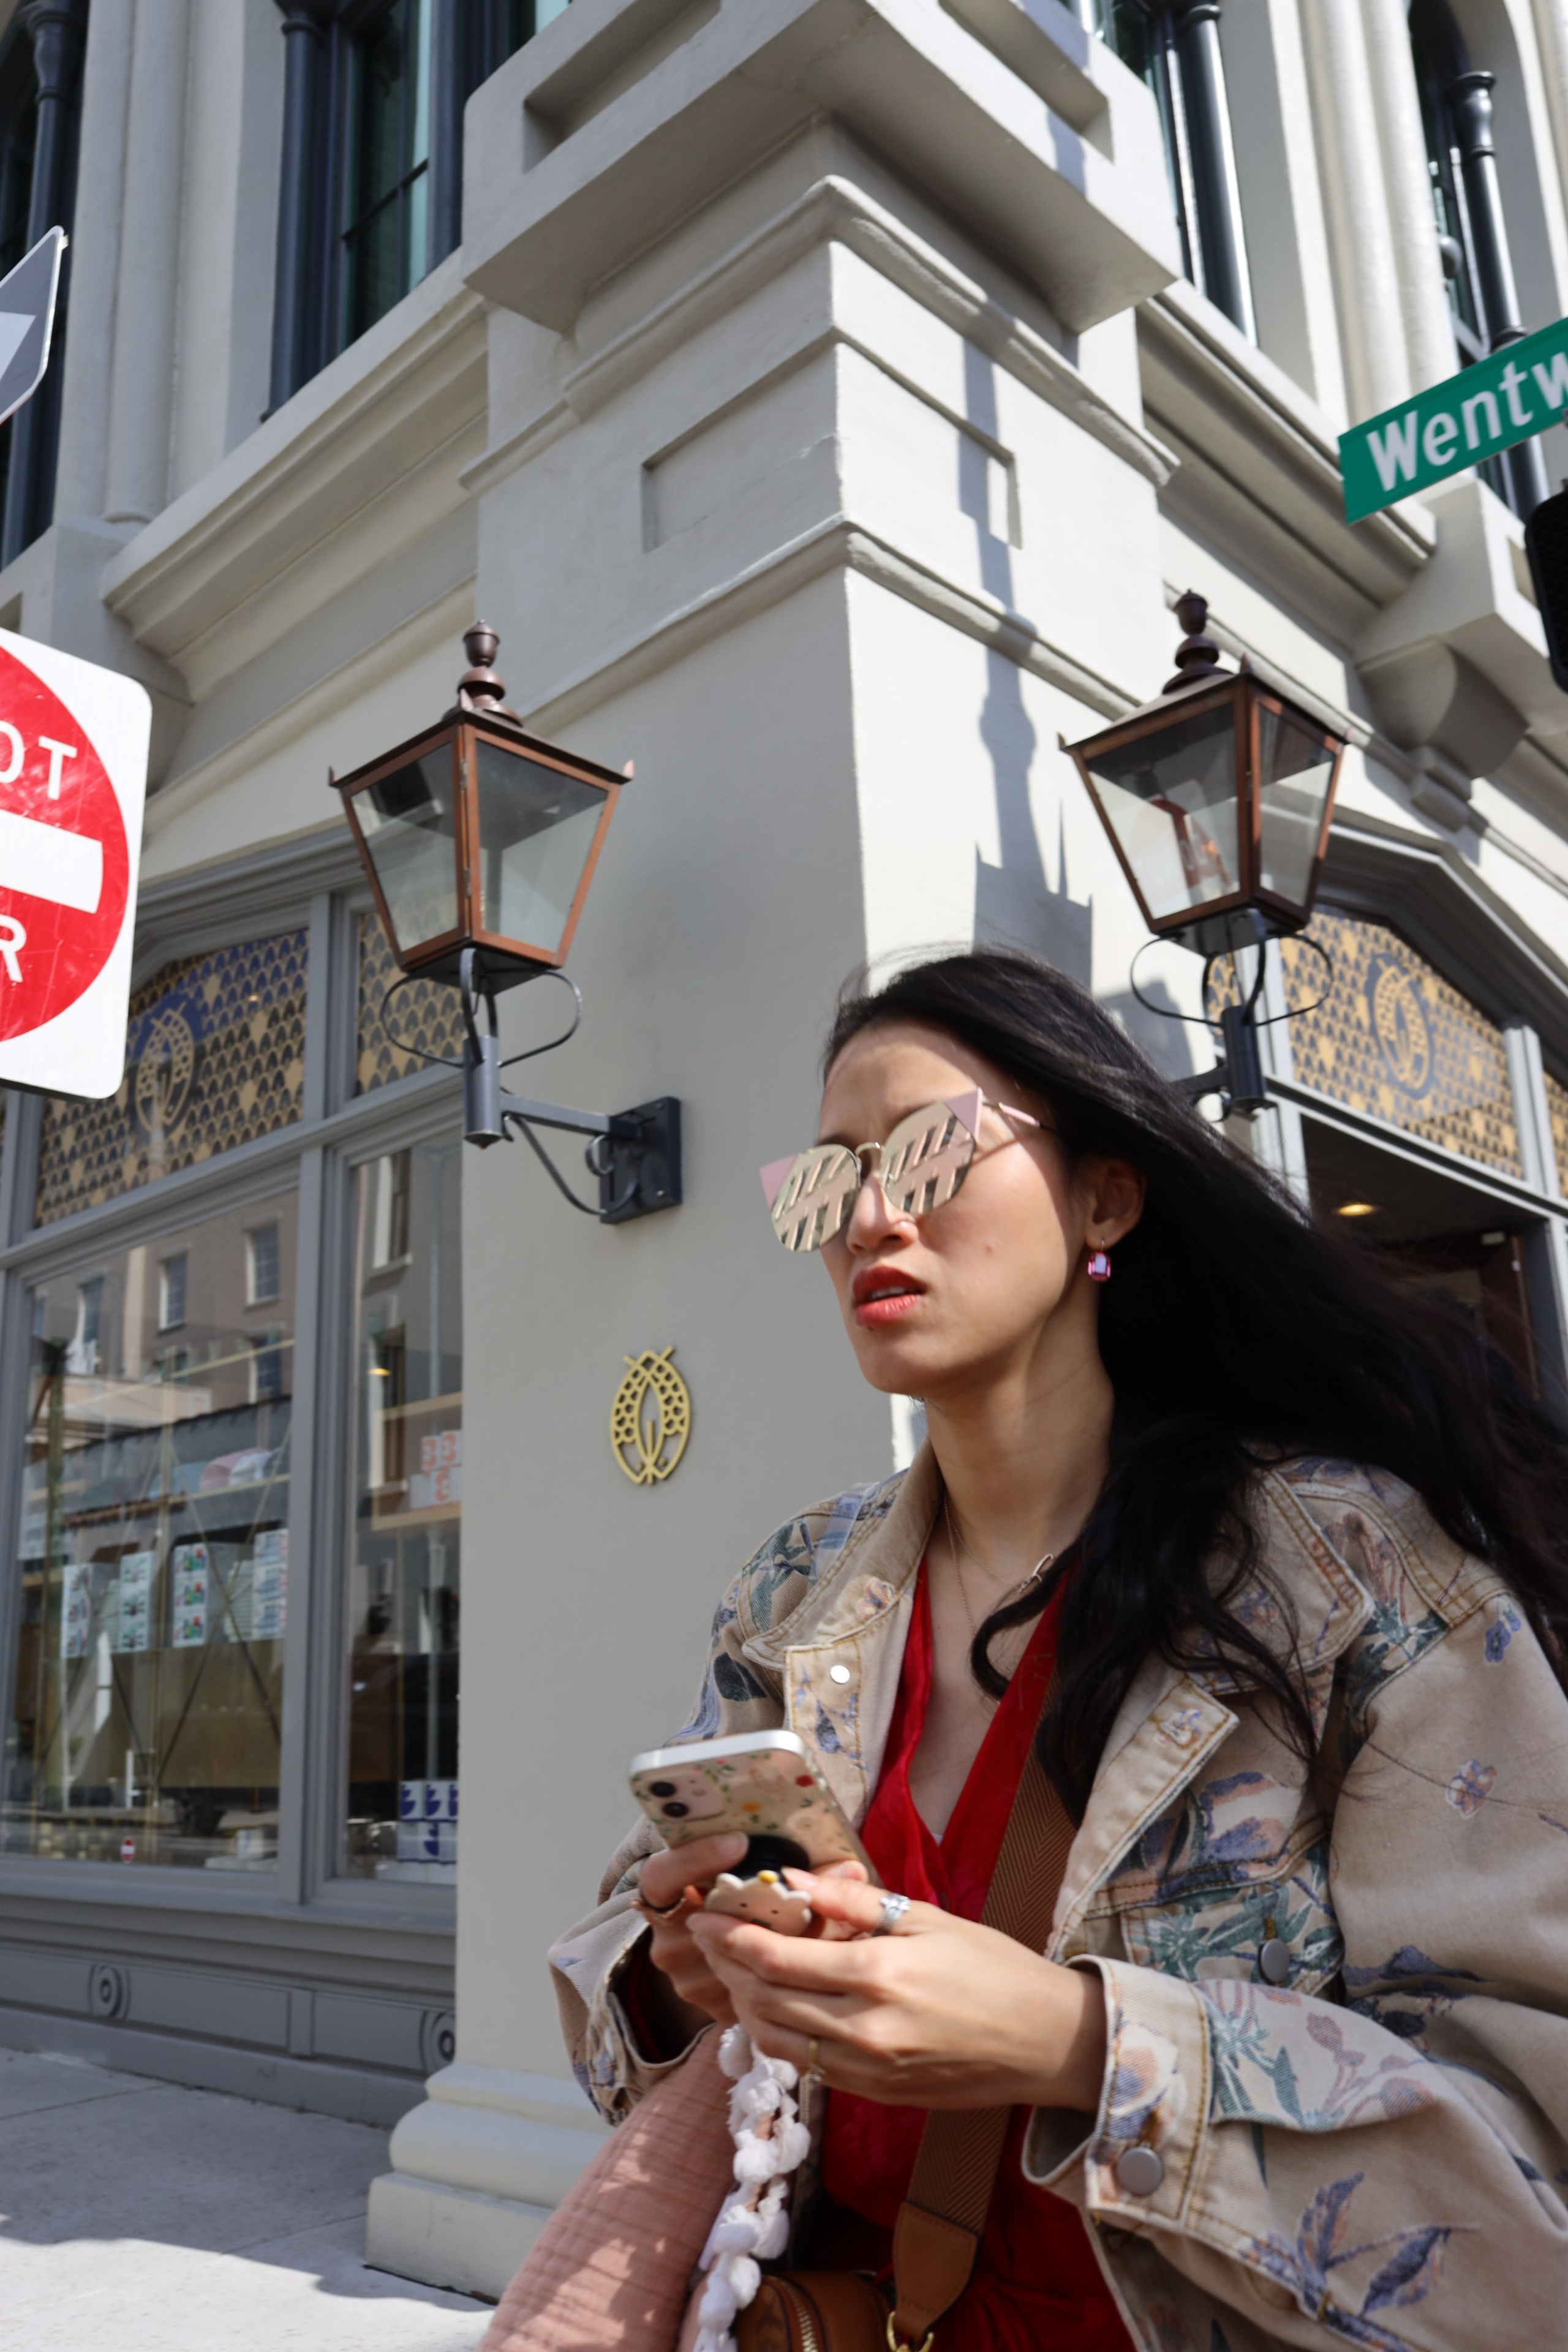
Charleston STREET PHOTOGRAPHY 2hr Workshop

CITYSCAPE PHOTOGRAPHY 2hr WORKSHOP — Learn to photograph the soul of a city
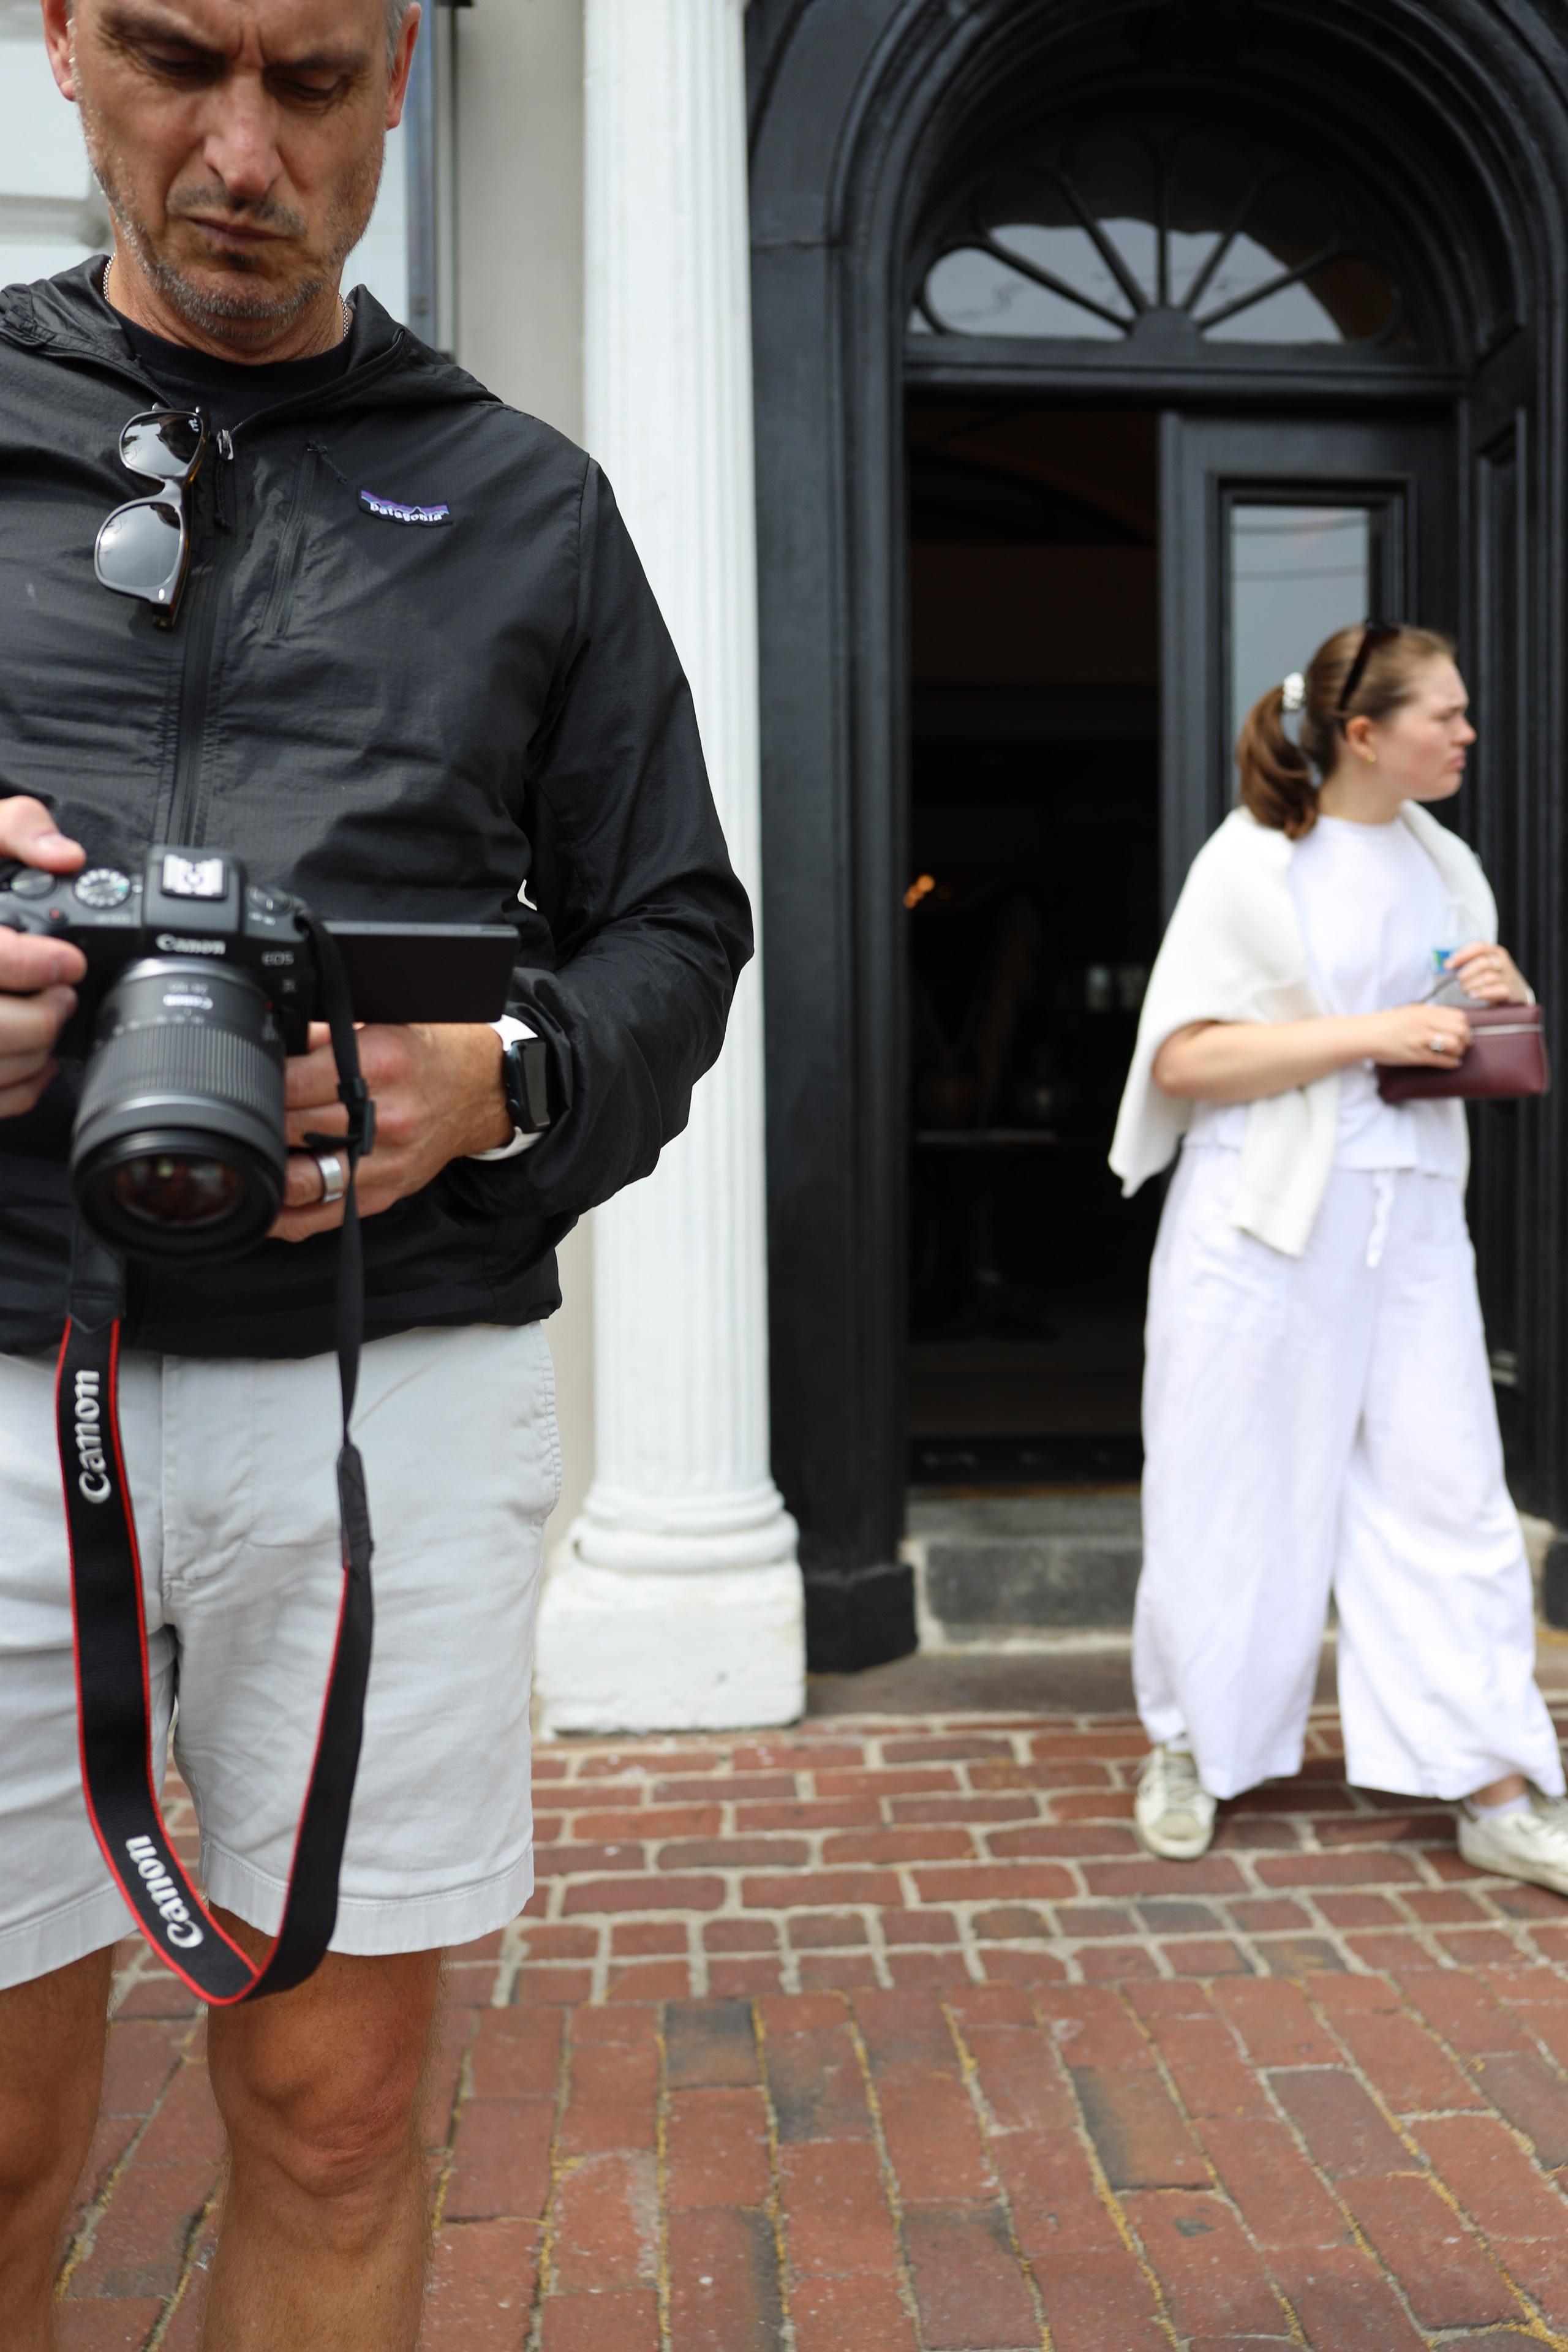
CHARLESTON WALK & SHOOT 2hr WORKSHOP (3-5pm)

SHALLOW DEPTH OF FIELD 2hr Workshop

FLATLAY PHOTOGRAPHY IN A CAFÉ 2Hr Workshop

PORTRAITURE WITH NATURAL LIGHT 2hr Workshop
NIGHT PHOTOGRAPHY WALK — Based on the Spirit in the album “Oh Mercy”
SMARTPHONE PHOTOGRAPHY 2hr Workshop

Sonny was an extremely knowledgeable instructor. I appreciate the way that he began the class by asking the participants what WE wanted to gain from the session, and then geared the class towards our goals. He was open to questions and ensured that we understood his responses. (…and he showed no outward remorse as I continued to fire questions at him 😉). I will complete my “homework” by taking hundreds of photos and applying what I learned. Once I become more comfortable using “manual mode”, I’ll look into future classes taught by him.